Sunday, February 21, 2010

Monday Mission: Household Manual

In my neverending quest to become more organized and keep this ship sailing smoothly - I will be sharing with you my Monday Missions. I'm going to give myself the week to accomplish them and share my ideas and resources with you! Maybe you can get a little more organized & efficient right along with me.

Mission 1: Create a Household Manual

I bought a cute 3 ring binder and matching expanding file and plan to keep this in my pantry so that it's always close at hand!

I was all set to create a few forms and calendars when I discovered these handy printable forms from the folks at Organized Home. See below for the ones that I included in my manual. Just click for the printable pdf! See the site for many more.

These first few forms I printed on cardstock for durability:

Emergency Contact List
Birthday and Anniversary List
Restaurant Take Out List
Spring & Summer To Do list
Fall & Winter To Do list
Monthly Calendars

I printed multiple copies of these and store them in protective sleeves:

Weekly To Do Lists
Shopping Lists
(no more scribbling on paper towels or old receipts! Yeah!)
Menu Planners

I printed these on plain paper:
Phone and Address Info
Phone Directory Sheet
(I plan to designate these for different groups such as 'neighbors' etc.)
Blank Pages
Perfect for gift idea lists, username and password info etc.
Recipes to Try
 (Organized Home - my hubbee thanks you!)

In business card sheets, I placed business cards for our most frequently used services such as our furnace repairman and my rent-a-hubby (handyman)! :)

In the pockets of the planner I placed a sheet of address labels, stamps and, of course, a few of my girlie printable playdate cards :) !

I don't even want to admit how long ago I bought the binder and file with the hopes of getting this all together. I'm just glad to have it checked off my to-do list!

Week 1: Monday Mission Accomplished!


post signature


Saturday, February 20, 2010

Sock Cupcakes

We have a dear friend who is recuperating from surgery, so Busy Bee and I have enjoyed sending her surprise mail and yesterday we whipped up this cute creation.

Can you guess what the cupcake is made from? A pair of super fuzzy socks! I found mine at Target, but I've heard that they also have them at Michael's in the $2 bins.

Santa brought me a new Cricut for Christmas and these are all the rage on the Cricut forums. I didn't have the cartridge/program needed so we just improvised with what I had. In about five minutes, we had this oh-so-sweet gift ready to go!

Materials:

-Fuzzy socks
-Scrapbook paper
-red construction paper for cherry
-Scissors
-gumband or elastic
-cellophane treatbag or ziploc(optional for wrapping)
-clear tape


Step 1: roll your socks tightly from heel to toe. Push center up to resemble an iced cupcake. Wrap gumband or elastic around middle.


2. Cut a strip of scrapbook paper. I was wondering how to make a template to offer on the blog when hubbee came home with a treat. Guess what fit my cupcake like a glove?


I then crimped my paper with one of my favorite scrapbooking tools!

3. Cut a small circle from the red paper for a cherry (I used a water bottle cap for tracing).

4. Wrap scrapbook paper around sock cupcake and close with clear tape. Add cherry on top and secure with tape.


5. Wrap for gift giving!

Bee Happy,
post signature

Tuesday, February 16, 2010

What I'm Loving & What I'm Wanting

Loving:

Busy Bee got this as a gift and it's been a big hit!
For $20 you can't go wrong with this for your own busy bee or as a gift.

Wanting:


You may have noticed that I LOVE Valentine's Day! Well, I won't be waiting for next year to get these, because I can already think of a dozen ways to use these before next year rolls around. These are so sweet!  I *think* that they were only $20 too!
I see that they are sold out online, but I'm crossing my fingers that I can find them locally.

Bee Happy,
post signature

Girl Play Date Card

Today Busy Bee and I were talking about planning a few playdates with her favorite little friends.

It inspired me to create a new little character and design a playdate card around her! I've never created a character before, but I'm hooked. Let me know what you think of her...

The lines are for your name and number! Simply fill in your personal info and mail! They should fit comfortably in an A6 envelope.

Head on over here to download the pdf. I have fit 2 to a page for your convenience. Have fun planning those playdates!

Moms of boys - don't worry - I'm working on a just-as-cute boy version!

Bee Happy,
post signature

Monday, February 15, 2010

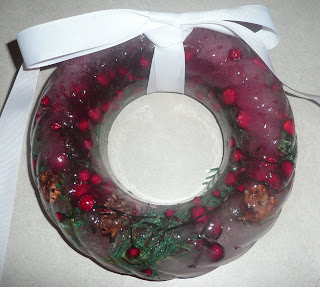
Ice Wreath

It's been perfect weather for this next project! I've been wanting to make one of these for years! I was all set to head to the store for some supplies when it started to snow and I decided to go "shopping" in my own home! Good thing that I did, because I forgot completely about a beautiful wreath that I had gotten on clearance last year. The backside was decorated and I wanted to remove that anyway so that it wouldn't scratch the door.

The leftovers were perfect! I had greenery, red berries and pinecones galore!

You simply take a bundt pan and fill it with your decorative items, add water and freeze!


Once Frozen, run warm water around the outside edges of pan. Your wreath will pop free!


Add a ribbon and hang outside! This is the best pic that I could get because it is coooooold outside!


Bee Happy,


post signature

Snow Watch 2010 Chart

Last weekend we started "Snow Watch 2010" and had a blast measuring the snow, creating weather forecasts on the flip video camera (even bundling up and doing them "on location" from our front yard) and updating our Snow Watch 2010 chart! We used 11 cotton balls per page to represent about an inch of snow. Yes, that means that we had about 24 inches of snow! And we're expecting more tonight!

If the idea of cotton balls and glue makes you nervous - as it did me - simply use a strip of foam poster tape. It held the cotton balls and was mess free! Phew!

Don't forget to get a picture of your busy bee beside the chart to show just how high the snow is!

Bee Happy,
post signature

Crochet Heart Envelope


Grammy Bee surprised us yesterday with this adorable crochet heart envelope! It is too adorable not to share! Perfect for gift cards and small gift giving.

 Busy Bee will be using it as a purse/wallet to spend her Valentine's gift card at mommy's favorite store: Target!

The pattern is available free from this site (although you do have to register).
It is 81111AD Valentine Envelope.

Bee Happy,
post signature

Sunday, February 14, 2010

Chocolate Covered Pretzels


Today Busy Bee and I whipped up a quick last minute gift for hubby - some homemade chocolate covered pretzels! We had all of the ingredients on hand and had them made in a matter of ten minutes!


Our secret ingredient was pink icing that we melted in the microwave for 20 seconds and then drizzled on top of the oh-so-sweet treats! Hubby raved about them and was nice enough to share!

Bee Happy,
post signature

Trail Of Hearts


Busy Bee woke up to a trail of craft foam hearts, each one with a special message detailing something that I LOVE about her! It was so easy to fill them up with sweet messages and Busy Bee enjoyed reading and rereading them all day long.

Along the trail we put some of her smaller treats and surprises and they all led to her larger ones!

I plan on binding the hearts into a book for Busy Bee- more on that later!

Bee Happy,
post signature

Friday, February 12, 2010

Doll Baby Tutu

This is one of my favorite crafts to do for big girls - and it struck me the other day that busy bee might love one for her favorite baby dolls to play dress up too!

For this project I took

Materials:
-a piece of ribbon trimmed to 2 feet
-tulle strips cut to 18 inches (about 40 of them - you'll have to adjust accordingly for the waist size of your doll)
*TIP* I used to buy the tulle by the yard at the fabric store and I would cut them... too much work! I finally thought of buying the tulle sold on the roll! It's already trimmed to the perfect width!


1. Lay your ribbon flat. Take one piece of tulle and fold it in half. Place behind your ribbon. You'll have a loop on top and two loose pieces on the bottom.


2. Take the two loose ends and pull through loop tightly. Repeat until all of the tulle is tied on to your ribbon.

If this isn't clear - check out this video for a great tutorial on tutu making!

You'll note that she uses the tulle sold in yards - it's so much easier to use the one on rolls! I found mine in the wedding department in assorted colors!

It's so simple! I created the doll baby one in less than 10 minutes!


Heart Hand Prints

If you are in a pinch for a cute Valentine's Day project, card or gift idea (this would be adorable framed!)... here's a perfect one for you!

Pick two complimentary colors and paint each of your busy bee's hands a different color. Have them place them on the paper in the shape of an upside down heart. Turn it rightside up and you have a heart made from your little one's handprints.

I defined the shape more by writing a special love note message around the edges!

Super simple, yet super sweet!


Bee Happy,
post signature

Tuesday, February 9, 2010

Potato Printing

With a simple heart cut from a potato we created three fun projects.


A Valentine's Day turtleneck.


Heart notecards to give as gifts.


Simple Valentines!

Bee Happy,

post signature

Snow Painting

Busy Bee had a few neighborhood kids down over the weekend and they had fun 'painting' the snow. I simply bought 4 spray bottles in the Target travel section and filled each one with some water dyed with food coloring.

This was a huge hit with big kids and little kids alike!

Bee Happy,
post signature

Heart Crayons


This is another oldie but goodie! Remember those trays that we used for our homemde gummy candies? Well, I got a second set so that we could whip up some heart shaped crayons.

The first time that I tried this project, I didn't think it was worth the hassle - but I've since learned a timesaving secret... soak the crayons in ice cold water first. Some of them peeled themselves!

Simply take your broken crayon pieces (I save restaurant ones for this purpose) and put them into a muffin tin or candy mold. Put into a 275 degree oven and remove when melted. Let cool and pop them out!

Stop back later for adorable bag toppers that you can print to share your crayon masterpieces with all of your busy bee's friends!

Bee Happy,
post signature

'Homemade'Lollipops

Ok, so these sweet lollipops are only semihomemade - but they turned out adorable! You can have these made and cooled in minutes!

Materials
-Jolly Rancher Candies
-Parchment Paper
-Cookie Sheet
-Lollipop sticks


Preheat your oven to 275. Line up 3 candies in a row. You'll probably be able to fit about 8-9 on a sheet and you'll want to stagger them to allow for the stick.
Pop them in the oven for about 5 minutes. They will start to melt and pool. Remove from the oven and insert stick. That's it!! Enjoy!


Look how adorable they look on top of a pretty package!


Bee Happy,
post signature